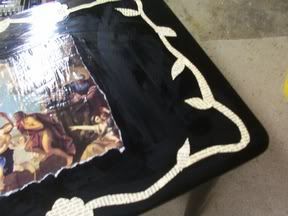
Stylin' Side Table
This project took a lot less time, because there's a lot less coverage. I wanted to go with a more traditional decoupage on it, and I am extremely pleased with the results. Since my pictures, as always, are a bit ruddy, allow me to note the details.
After sanding off the tacky school room brown finish, I painted the whole thing with a high gloss black paint. On the shorter sides, there is a small lip, so I split a cut out of a biblical painting of some angels in two horizontally and decou'd them there. On the longer stretches are smaller individual paintings. The top I carefully tore the edges from another angel painting (I bought a calander for this purpose, so I have twelve bitchin' rennaisance paintings). That is what you see in the center. That lovely little vine I first drew out on a piece of paper, then cut more pieces of that german book to piece it together. Those got decou'd, and the whole shebang got a super-gloss finish. The thing looks fantastic! Unfortunately, it's currently residing in the corner of our living room as a way to keep Anthony from messing with our standing lamp. Once we re-arrange the furniture in there, it will have a more prominent setting.


Next few projects I have lined up are actually just my plain paintings, I'm giving the home decor stuff a rest for the time being. I have been fiddling with some polymer clay, and have fashioned a few cutesy hanging items for my kitchen. I'll see if I can get pics. Oh yeah, and I plan on decoupaging the knife block on my counter. I saw someone else do it and it looked waaaaaaaay cool.
For anyone interested in taking up decoupage, I'd like to provide an oh-so-valuable link. http://www.createforless.com
This store has not only bulk image packs to get yourself going, but cheaply priced decou-goo to get you started (I prefer Plaid Mod Podge in the gloss finish). I stumbled across these folks while looking for printed images to decou with and was giddy to see all they had, especially since their prices are a lot better than most craft stores. Enjoy!
After sanding off the tacky school room brown finish, I painted the whole thing with a high gloss black paint. On the shorter sides, there is a small lip, so I split a cut out of a biblical painting of some angels in two horizontally and decou'd them there. On the longer stretches are smaller individual paintings. The top I carefully tore the edges from another angel painting (I bought a calander for this purpose, so I have twelve bitchin' rennaisance paintings). That is what you see in the center. That lovely little vine I first drew out on a piece of paper, then cut more pieces of that german book to piece it together. Those got decou'd, and the whole shebang got a super-gloss finish. The thing looks fantastic! Unfortunately, it's currently residing in the corner of our living room as a way to keep Anthony from messing with our standing lamp. Once we re-arrange the furniture in there, it will have a more prominent setting.


Next few projects I have lined up are actually just my plain paintings, I'm giving the home decor stuff a rest for the time being. I have been fiddling with some polymer clay, and have fashioned a few cutesy hanging items for my kitchen. I'll see if I can get pics. Oh yeah, and I plan on decoupaging the knife block on my counter. I saw someone else do it and it looked waaaaaaaay cool.
For anyone interested in taking up decoupage, I'd like to provide an oh-so-valuable link. http://www.createforless.com
This store has not only bulk image packs to get yourself going, but cheaply priced decou-goo to get you started (I prefer Plaid Mod Podge in the gloss finish). I stumbled across these folks while looking for printed images to decou with and was giddy to see all they had, especially since their prices are a lot better than most craft stores. Enjoy!


0 Comments:
Post a Comment
<< Home